
Techniques > Surveying > Survey Methods > Problems with Photography Underwater
Techniques: Problems with Photography Underwater
Version date: 12 August 2018
Introduction
Photography is used for many jobs on an archaeology project including the creation of photomosaics, making digital models using 3D Photogrammetry and photographing finds.
There are lots of factors that make photography underwater more difficult than photography on land. But if we understand these issues then we can make sure we take photographs that minimise the problems.
Some of the problems include:
- Limited access - What you want to photograph is underwater so just getting there can be difficult and the time available to do the work is limited.
- Low light levels - Its darker underwater, sometimes very dark.
- Light diffusion - You cannot see very far even in clear water.
- Lens distortion - Photographs are distorted because the light gets refracted as it passes from the water through the lens and into the camera.
- Colour changes with depth - Different colours get absorbed at different depths so underwater photographs in can havea blue or green tint.
We will look at each of these problems below along with some of the effects they cause.
Click on any image below to show a larger version.
Problem 1 - Limited Access
What you want to photograph is underwater so just getting there can be difficult and the time available to do the work is limited
Problem 2 - Low light levels
Its darker underwater, sometimes very dark.
Problem 3 - Light Diffusion
You cannot see very far even in clear water.
Problem 4 - Lens Distortion
Pictures taken by a camera will all be affected by some form of distortion, a bending or warping of the image that can be seen as curves in lines that should appear straight. Better quality cameras and lenses will produce less distortion in the images, but the wrong lens port on an underwater camera housing can also make a good quality camera produce poor images.
Distortion in the pictures needs to be removed before they are put together in a mosaic. The distortion will move the position of objects in the picture so if you attempted to match up features on two pictures they would not line up correctly, or the alignment would be wrong causing the mosaic to be distorted. Distortions tend to affect the edges of the picture more than the centre. Typical problems include barrel distortion where the middle of the picture appears to be pushed out, curving any straight lines away from the centre of the picture, or pincushion distortion where the middle of the picture is pushed in, curving any lines inwards towards the centre of the picture.
A camera can be tested for distortion by photographing a brick wall or grid fence on land, as if there is no distortion the straight lines in the picture should remain straight. For an underwater camera the distortion can be estimated by photographing a planning frame as shown in figure 4 below. Alternatively, place two scale bars on the seabed at right angles to each other touching at one end, then photograph them with the point where they touch in a corner of the photograph so the scale bars run along two edges of the picture. With underwater housings that have a flat lens port this test should be done at the depth of the wreck being photographed as distortion may change with depth as the water pressure bends the flat lens port.
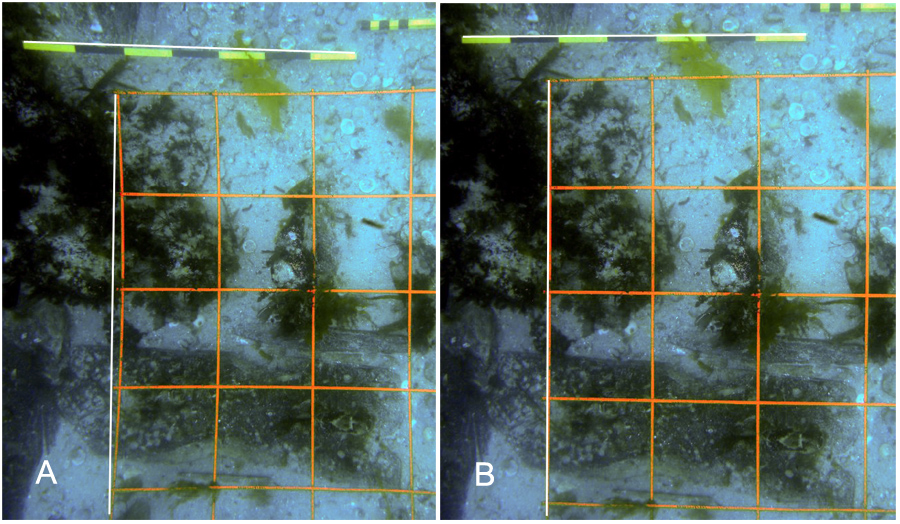
Fig 4: Correcting camera distortion; A is the uncorrected image and B is the corrected image
Small amounts of barrel and pincushion distortion can be corrected in software. Figure 4 shows the effect of correcting a test image, the uncorrected image A shows pincushion distortion, the straight sides of the grid frame and scale bar are curved in towards the centre. Image B shows the corrected version with all the lines now straight. The correction applied to the test image will be the same correction that is needed for the other photographs so they can now be corrected too.
Problem 5 - Colour Changes with Depth
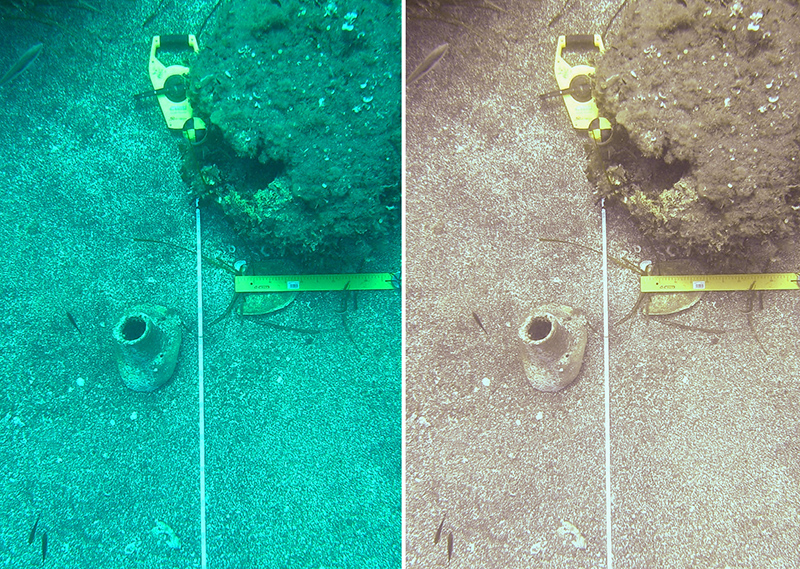
Fig 5: Raw image with blue colour cast (left) and colour corrected image (right)
Colour correction is not normally required when taking photographs on land as the white balance is managed automatically in modern cameras, but underwater this is a more common problem as different colours of light get absorbed at different depths. Solutions include manually setting white balance on the site underwater or to record Raw images and correct afterwards. Where the camera does not allow either to be done the correction can be done in software as shown in Figure 5, the left image shows the raw picture with a blue colour cast and on the right is the same picture with the colour cast removed.
Low Contrast Effects
The combination of low light, diffusion and colour absorbtion can make photographs under natural light have very little contrast. Contrast is the difference between the blacks and the whites. High contrast means the blacks in the photograph are really dark and the whites are really bright. Typically something that is low contrast looks like it has a gray wash to it, so the blacks are more like a dark gray, and the whites a light gray.
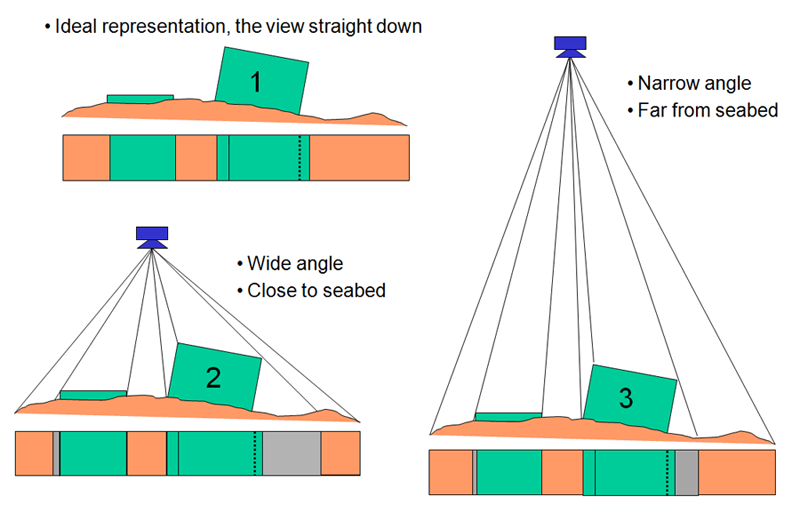
Fig 11: Problems with wide angle lenses on sites that are not flat
Lens Effects
Wide angle lenses can work well for making mosaics in poor visibility but they only produce good results on objects that are flat. Problems occur when areas of the object or seabed being photographed are much closer to the camera. Figure 11 shows the problem as three examples of a strip of seabed being photographed. In the ideal case in the top left a photograph of the plan view of the green two blocks would produce the image shown underneath, a similar record that would be made as a drawing using a planning frame. If we use a wide angle lens close to the blocks we get the image shown bottom left; the camera records more of the sides of the block and a large patch of seabed shown in grey becomes hidden by the right hand block. Using a narrower angle lens is an improvement as shown right, but the camera has to be much further away from the seabed, which does not work in low visibility.
Also, if the camera is maintained at a constant height above the seabed then any tall objects closer to the camera become large and distorted. The mosaic in Figure 12 shows this problem. A large trawl winch stands 1.5m tall on the flat deck of the Elk trawler and the photograph of it taken with the wide angle lens produces a very distorted image.
To produce a good mosaic with a wide angle lens any objects on the seabed should be no taller than 20% of the distance between the camera and the seabed. For example, if the camera was at an altitude of 5m above the seabed then the tallest object on the seabed should be less than 1m high.
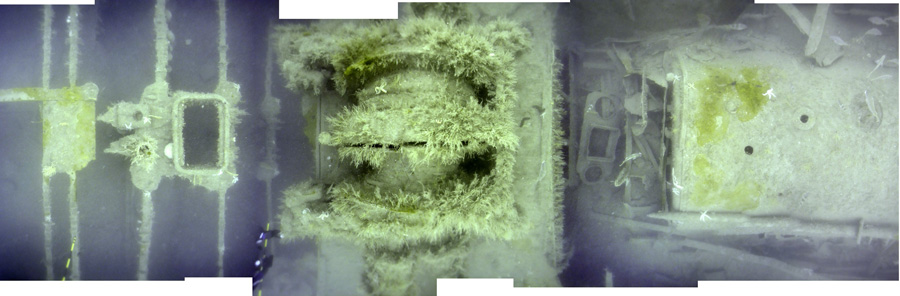
Fig 12: Very distorted trawl winch in the middle of the Elk deck mosaic, the winch was very much closer to the camera than the deck below