
Techniques > Recording > Finds Recording
Techniques: Finds Recording
Version date: 16 October 2016
Objects found underwater and on the foreshore can tell us a lot about the history of the area.
Recording
The basic information about the object is recorded such as dimensions, materials it is made from and condition
Photography
The object is photographed from a number of angles so all aspects of it are recorded.
Drawing
Historically important or unusual objects are drawn on paper.
Research
By researching the object we can identify it more accurately, find out more about it and estimate a date that it was made.
Publication
The most important step is to share the information we have learned by making it available to the public, so each object gets its own page on the web site where we can add photographs, drawings and detailed information about it.
Recording Finds
Sometime we cannot get to see the objects that you have recovered so you can record the objects yourself and send us the information. Its best if you get in touch with us first so we can provide advice if needed but you can just send us the information. We usually make sure that the information you send remains anonymous, see the Note on Privacy below.
Below are instructions that you can follow that will get the information we need. The first step is to record the object with the help of a short form you can fill in and after that you can take a few photographs and send those to us as well. The other steps mentioned above like doing a drawing or sending us your research are optional and do not have to be done.
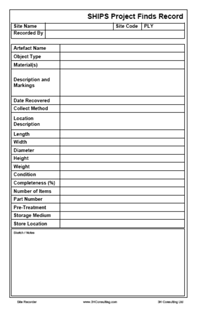
Click the form on the right or here to download a PDF copy of the form itself.
Step 1: Recording
To make this easy we have amde a form that you can fill in so you record all of the information we need.
The form can be printed on a single sheet of paper, filled in or emailed back to us, alternatively you can fill in the electronic version of the form and send that to us instead.
If you are unsure of what to put in any of the fields then just leave them blank. We may be able to fill them in later once we have looked at the photographs you sent with the form.
Below is an explanation of what to put in each of the fields on the form:
Site Name |
The common name for the site where the Artefact was found |
Site Code |
This is the code for the site where the object was recovered |
Recorded By |
Put the name of the person who recorded the object here |
Artefact Name |
|
Object Type |
A simple name for the type of Artefact, such as ‘Spoon’, ‘Bottle’ etc. |
Material(s) |
Please write down the types of materials used to make up the object with the most significant listed first. if you are unsure then please leave this blank. |
Description and Markings |
Please write a short description of the object and make a note of any markings or lettering written on it |
Date Recovered |
This is date the object was recovered in the form DD MM YYYY, such as ‘24 09 2009’. Please estimate a year if you are unsure when it was found |
Location Description |
Write a short description of where the object was found |
Length, Width, Diameter, Height |
The dimensions of the object. Record each dimension across the widest point and include any additional measurements in the Notes. |
Weight |
The weight of the object in kilogrammes |
Condition |
The average condition of the object, choose from: Good | Average | Poor |
Completeness |
The estimated completeness in percent, choose from: 100% | 75% | 50% | 25% | <10% |
Number of Items |
The number of items that are covered by this recording form, so if you found 10 musket balls all the same then put '10' in this field. |
Pre-Treatment |
Any treatment given to the Artefact, like being cleaned, washed in fresh water or conserved |
Storage Medium |
What is the object stored in now: Salt water, fresh water, air |
Store Location |
Where the object is now |
Sketch / Notes |
Put additional information here and include a sketch if possible |
Step 2: Photography
We only need a few photographs of each object, ones that show different views of an object as well as zoomed in shots of markings or detail. Please include photographs of:
1. A general view of the object
2. The view from the front
3. The view from the side
4. The view from the top
5. Photographs of markings, lettering or important details
The way the photographs are taken is important too:
1. Please take photos somewhere bright and in daylight so you do not need to use the camera's flash
2. Turn off the camera's flash if possible
3. Put a plain coloured backdrop behind the object, such as a towel or a sheet. Blue and grey colours work well.
4. Put a scale in the photograph so we can see how big the object is.
A ruler works well as a scale, a proper photo scale is best but even a pen or a coin can be used as we know how big they usually are.
You can get a good idea of the kind of photographs we need by looking at the ones we have included for the objects we have published already.
Step 3: Finds Drawing
Step 4: Research